Showing posts with label Tips and Trick. Show all posts

Thursday, March 3, 2011

Free File Hosting


A Big Collection of Free File Hosting

Collection of 50+ free file hosting from 10MB to 2GB that do not require registration, with detailed of file size limit, download limit and file life. Keep it for future reference.

Indowebster.com
Maknyos.com
Filefront.com / Gamefront.com


Mediafire
File Size Limit:
Free users can upload files up to 200MB in size. Pro users can upload files up to 10GB in size. Image files can be no larger than 25MB and 20000x14200 pixels in dimension for both Pro and free users.
Download Limit: Unlimited
File Life: Never Expired as long as the user login every month
URL: http://www.mediafire.com

 SendOver
File Size Limit: 2GB
Download Limit: Unlimited
File Life: 7 Days (Deleted only if there is no download activity in 7 days)
URL: http://www.sendover.com

FileFactory
File Size Limit: 1.5GB
Download Limit: 25 Downloads
File Life: 7 Days
URL: http://www.filefactory.com

MegaShares
File Size Limit: 1.5GB
Download Limit: Unlimited
File Life: 25 Days (Deleted only if there is no download activity in 25 days)
URL: http://www.megashares.com

SendSpace
File Size Limit: 1.2GB
Download Limit: download bandwidth limit of 100GB
File Life: 14 Days (Deleted only if there is no download activity in 14 days)
URL: http://www.sendspace.com

YouSendIt
File Size Limit: 1GB
Download Limit: 25 Downloads
File Life: 7 Days
URL: http://www.yousendit.com

TransferBigFiles
File Size Limit: 1GB
Download Limit: 20 Downloads
File Life: 5 Days
URL: http://www.transferbigfiles.com

BaDonGo
File Size Limit: 1GB
Download Limit: Unlimited
File Life: Unknown
URL: http://www.badongo.com

mailbigfile
File Size Limit: 1GB
Download Limit: 3 Downloads
File Life: 7 Days
URL: http://www.mailbigfile.com

Easy File Host
File Size Limit: 1GB
Download Limit: Unlimited
File Life: Unlimited
URL: http://www.easyfilehost.com

Up-FILE
File Size Limit: 1GB
Download Limit: Unlimited
File Life: Unlimited
URL: http://up-file.com

OxyShare
File Size Limit: 700MB
Download Limit: Unlimited
File Life: 30 Days (Deleted only if there is no download activity in 30 days)
URL: http://www.oxyshare.com

zUpload
File Size Limit: 500MB
Download Limit: Unlimited
File Life: 30 Days (Deleted only if there is no download activity in 30 days)
URL: http://www.zupload.com

Spread-It
File Size Limit: 500MB
Download Limit: Unlimited
File Life: 14 Days
URL: http://www.spread-it.com

FileFactory
File Size Limit: 500MB
Download Limit: Unlimited
File Life: 15 Days (Deleted only if there is no download activity in 15 days)
URL: http://www.filefactory.com

mooload
File Size Limit: 500MB
Download Limit: Unlimited
File Life: 30 Days (Deleted only if there is no download activity in 30 days)
URL: http://www.mooload.com

CyberUpload
File Size Limit: 500MB
Download Limit: Unlimited
File Life: 7 Days (Deleted only if there is no download activity in 7 days)
URL: http://www.cyberupload.com

Uploading
File Size Limit: 500MB
Download Limit: Unlimited
File Life: 30 Days (Deleted only if there is no download activity in 30 days)
URL: http://www.uploading.com

Snaggys
File Size Limit: 500MB
Download Limit: 999 Downloads
File Life: 15 Days
URL: http://www.snaggys.com

Fupload
File Size Limit: 500MB
Download Limit: Unlimited
File Life: 25 Days
URL: http://www.fupload.com

UploadReady
File Size Limit: 500MB
Download Limit: Unlimited
File Life: 30 Days (Deleted only if there is no download activity in 30 days)
URL: http://www.uploadready.com

Bigupload
File Size Limit: 300MB
Download Limit: Unlimited
File Life: 30 Days (Deleted only if there is no download activity in 30 days)
URL: http://www.bigupload.com

RapidUpload
File Size Limit: 300MB
Download Limit: Unlimited
File Life: 30 Days (Deleted only if there is no download activity in 30 days)
URL: http://www.rapidupload.com

ShareBigFile
File Size Limit: 300MB
Download Limit: Unlimited
File Life: 21 Days
URL: http://www.sharebigfile.com

MegaUpload
File Size Limit: 250MB
Download Limit: Unlimited
File Life: 30 Days (Deleted only if there is no download activity in 30 days)
URL: http://www.megaupload.com

UpDownloadServer
File Size Limit: 250MB
Download Limit: Unlimited
File Life: Unlimited
http://www.updownloadserver.de

XtraFile
File Size Limit: 250MB
Download Limit: Unlimited
File Life: 15 Days (Deleted only if there is no download activity in 15 days)
URL: http://www.xtrafile.com

bonpoo
File Size Limit: 250MB
Download Limit: Unlimited
File Life: 10 Days
URL: http://www.bonpoo.com

FileCache
File Size Limit: 250MB
Download Limit: Unlimited
File Life: 31 Days
URL: http://www.filecache.de/upload

Hemen Paylas
File Size Limit: 250MB
Download Limit: Unknown
File Life: Unknown
URL: http://www.hemenpaylas.com

upload2.com
File Size Limit: 250MB
Download Limit: Unknown
File Life: Unknown
URL: http://www.upload2.com

Supload
File Size Limit: 200MB
Download Limit: 30 Downloads
File Life: 7 Days
URL: http://supload.com/sendfile

uploadyourfiles
File Size Limit: 200MB
Download Limit: Unlimited
File Life: 30 Days
URL: http://www.uploadyourfiles.de

AxiFile
File Size Limit: 150MB
Download Limit: Unlimited
File Life: 30 Days
URL: http://www.axifile.com

Speedy Share
File Size Limit: 128MB
Download Limit: Unlimited (Limit of 5GB per file per day)
File Life: 7 Days (Deleted only if there is no download activity in 7 days)
URL: http://www.speedyshare.com

JustUpit
File Size Limit: 120MB
Download Limit: Unlimited
File Life: 30 Days (Deleted only if there is no download activity in 30 days)
URL: http://www.justupit.com

RapidShare
File Size Limit: 100MB
Download Limit: Unlimited
File Life: 30 Days (Deleted only if there is no download activity in 30 days)
URL: http://www.rapidshare.de

myShareBox
File Size Limit: 100MB
Download Limit: Unlimited
File Life: 30 Days (Deleted only if there is no download activity in 30 days)
URL: http://www.mysharebox.com

TheUpload
File Size Limit: 100MB
Download Limit: Unlimited
File Life: 30 Days
URL: http://www.theupload.com

zSHARE
File Size Limit: 100MB
Download Limit: Unlimited
File Life: 10 Days (Deleted only if there is no download activity in 10 days)
URL: http://zshare.net

Upload.Sc
File Size Limit: 100MB
Download Limit: Unlimited
File Life: Unknown
URL: http://www.upload.sc

Store and Serve
File Size Limit: 100MB
Download Limit: Unlimited
File Life: 30 Days (Deleted only if there is no download activity in 30 days)
URL: http://storeandserve.com

BIGfileupload
File Size Limit: 100MB
Download Limit: Unlimited
File Life: Unlimited
URL: http://bigfileupload.com

QuickDump
File Size Limit: 100MB
Download Limit: download bandwidth limit of 500MB per hour
File Life: 30 Days (Deleted only if there is no download activity in 30 days)
URL: http://quickdump.com

Content-Type
File Size Limit: 100MB
Download Limit: Unlimited
File Life: 7 Days (Deleted only if there is no download activity in 7 days)
URL: http://www.content-type.com

Upload-File
File Size Limit: 100MB
Download Limit: 50 Downloads
File Life: 30 Days
URL: http://www.upload-file.net

StreamUpload
File Size Limit: 100MB
Download Limit: Unlimited
File Life: 30 Days
URL: http://www.streamupload.com

JumboFile
File Size Limit: 100MB
Download Limit: Unknown
File Life: Unknown
URL: http://www.jumbofile.com

Easy-Sharing
File Size Limit: 75MB
Download Limit: Unlimited
File Life: 30 Days
URL: http://www.easy-sharing.com

Turbo Upload
File Size Limit: 70MB
Download Limit: Unlimited
File Life: Unknown
URL: http://www.turboupload.com

SaveFile
File Size Limit: 60MB
Download Limit: Unlimited
File Life: 14 Days (Deleted only if there is no download activity in 14 days)
URL: http://www.savefile.com

FileHD
File Size Limit: 60MB
Download Limit: Unlimited
File Life: 30 Days (Deleted only if there is no download activity in 30 days)
URL: http://www.filehd.com

InternetFiles
File Size Limit: 60MB
Download Limit: Unlimited
File Life: 30 Days (Deleted only if there is no download activity in 30 days)
URL: http://www.internetfiles.org

RapidSharing
File Size Limit: 50MB
Download Limit: Unlimited
File Life: 60 Days (Deleted only if there is no download activity in 60 days)
URL: http://www.rapidsharing.com

UploadSend
File Size Limit: 50MB
Download Limit: Unlimited
File Life: 30 Days (Deleted only if there is no download activity in 30 days)
URL: http://www.uploadsend.com

UploadFront
File Size Limit: 50MB
Download Limit: Unlimited
File Life: 30 Days (Deleted only if there is no download activity in 30 days)
URL: http://www.uploadfront.com

FreeUploader
File Size Limit: 50MB
Download Limit: Unknown
File Life: Unknown
URL: http://www.freeuploader.com

Momoshare
File Size Limit: 50MB
Download Limit: Unlimited
File Life: 15 Days (Deleted only if there is no download activity in 15 days)
URL: http://www.momoshare.com

FriendlyShare
File Size Limit: 50MB
Download Limit: Unlimited
File Life: 30 Days (Deleted only if there is no download activity in 30 days)
URL: http://www.friendlyshare.de

orb-z
File Size Limit: 50MB
Download Limit: 200 Downloads
File Life: 15 Days
URL: http://www.orb-z.com

UploadHut
File Size Limit: 50MB
Download Limit: Unlimited
File Life: 30 Days
URL: http://www.uploadhut.com

SupaShare
File Size Limit: 50MB
Download Limit: Unlimited
File Life: 14 Days
URL: http://www.supashare.com

FileHost
File Size Limit: 50MB
Download Limit: Unknown
File Life: Unknown
URL: http://www.filehost.ro

ushareit
File Size Limit: 50MB
Download Limit: Unknown
File Life: Unknown
URL: http://www.ushareit.com

SceneWorld
File Size Limit: 50MB
Download Limit: 1000 Downloads
File Life: 50 Days
URL: http://www.sceneworld.net/up

GetFile
File Size Limit: 50MB
Download Limit: Unlimited
File Life: 14 Days
URL: http://www.getfile.biz/upload/cl.html

YourFile
File Size Limit: 50MB
Download Limit: Unlimited
File Life: 30 Days (Deleted only if there is no download activity in 30 days)
URL: http://yourfile.org

BigFilez
File Size Limit: 50MB
Download Limit: Unlimited
File Life: 14 Days (Deleted only if there is no download activity in 14 days)
URL: http://www.bigfilez.com

Your File Link
File Size Limit: 50MB
Download Limit: Unlimited
File Life: 30 Days (Deleted only if there is no download activity in 30 days)
URL: http://www.yourfilelink.com

MyTempDir
File Size Limit: 40MB
Download Limit: Unlimited
File Life: 21 Days
URL: http://www.mytempdir.com

Send File
File Size Limit: 40MB
Download Limit: 10 Downloads
File Life: 10 Days
URL: http://www.send-file.co.uk

FileBuffer
File Size Limit: 40MB
Download Limit: Unlimited
File Life: 7 Days (Deleted only if there is no download activity in 7 days)
URL: http://www.filebuffer.net

UltraShare
File Size Limit: 30MB
Download Limit: Unlimited
File Life: 30 Days (Deleted only if there is no download activity in 30 days)
URL: http://www.ultrashare.net

UploadTemple
File Size Limit: 30MB
Download Limit: Unlimited
File Life: 21 Days
URL: http://www.uploadtemple.com

SendMeFile
File Size Limit: 30MB
Download Limit: Unlimited
File Life: 14 Days
URL: http://www.sendmefile.com

Upload2
File Size Limit: 25MB
Download Limit: Unlimited
File Life: 1 Year
URL: http://upload2.net

filegone
File Size Limit: 25MB
Download Limit: Unlimited
File Life: 100 Days (Deleted only if there is no download activity in 100 days)
URL: http://www.filegone.com

UploadTown
File Size Limit: 20MB
Download Limit: Unlimited
File Life: 30 Days (Deleted only if there is no download activity in 30 days)
URL: http://www.uploadtown.com

11MBIT.in
File Size Limit: 20MB
Download Limit: Unknown
File Life: Unknown
URL: http://a1.11mbit.in

Refrozen
File Size Limit: 20MB
Download Limit: Unknown
File Life: Unknown
URL: http://www.refrozen.com

Crazefiles
File Size Limit: 20MB
Download Limit: 50 Downloads
File Life: 14 Days
URL: http://www.crazefiles.com

hackz.nu
File Size Limit: 20MB
Download Limit: Unlimited
File Life: Unknown
URL: http://www.hackz.nu

Zhube
File Size Limit: 20MB
Download Limit: Unlimited
File Life: 15 Days (Deleted only if there is no download activity in 15 days)
URL: http://www.zhube.com

KeepMyFile
File Size Limit: 15MB
Download Limit: Unknown
File Life: Unknown
URL: http://keepmyfile.com

Hyperupload
File Size Limit: 10MB
Download Limit: Unlimited
File Life: Unlimited
URL: http://www.hyperupload.com

WebFileHost
File Size Limit: 10MB
Download Limit: Unlimited
File Life: 30 Days
URL: http://www.webfilehost.com

Free-Transfer
File Size Limit: 10MB
Download Limit: Unlimited
File Life: 7 Days
URL: http://www.free-transfer.de


[2005-12-09]
+ BaDonGo (1GB)
+ Fupload (500MB)
+ Hemen Paylas (250MB)
+ uploadyourfiles (200MB)
+ Content-Type (100MB)
+ GetFile (50MB)
+ YourFile (50MB)
+ BigFilez (50MB)
+ FileBuffer (40MB)
+ Crazefiles (20MB)
+ hackz.nu (20MB)
+ Free-Transfer (10MB)

[2006-02-19]
+ mailbigfile (1GB)
+ Easy File Host (1GB)
+ AxiFile (150MB)
+ Speedy Share (128MB)
+ JustUpit (120MB)
+ Upload-File (100MB)
+ StreamUpload (100MB)
+ filegone (25MB)

[2006-02-24]
+ Up-FILE (1GB)
+ OxyShare (700MB)
+ UploadReady (500MB)
+ upload2.com (250MB)
+ JumboFile (100MB)
+ InternetFiles (60MB)
+ Your File Link (50MB)
+ Zhube (20MB)

Tuesday, March 1, 2011

Cara Blokir Situs Porno

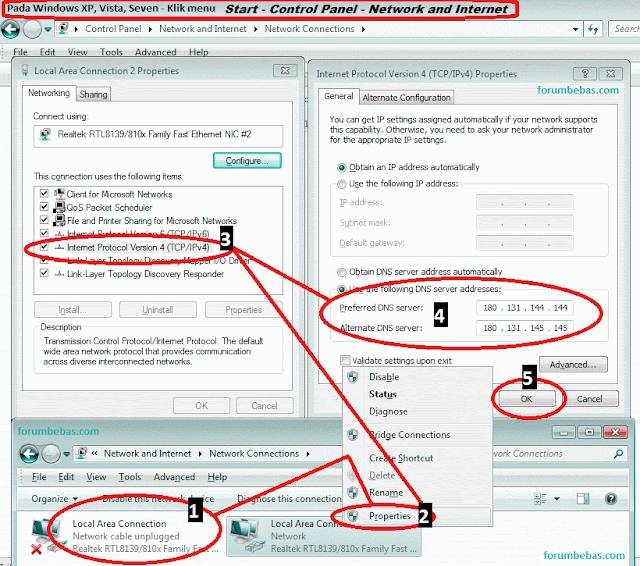
DNS NAWALA merupakan layanan gratis yang bebas digunakan pengguna Internet untuk menyaring konten negatif dan konten porno. Cara menggunakan fasilitas DNS Nawala cukup mudah, yaitu cukup melakukan perubahan konfigurasi IP DNS komputer ke alamat IP 180.131.144.144 (primary) dan 180.131.145.145 (secondary)

Step By Step Tutorial setting DNS Nawala (pada windows XP):


1. Klik Start > Control Panel > Network Connection
2. Klik kanan pada Wireless Network Connection atau Local Area Connection atau koneksi yang aktif
    dipakai.
3. Setelah klik kanan, pilih pilihan properties.
4. Kemudian sorot pada Internet protocol (TCP/IP)
5. setelah disorot, kemudian klik button properties.
6. Klik pada pilihan use the following DNS Server Address
7. Kemudian isilah
    Preferred DNS server dengan 180.131.144.144
    alternate DNS server dengan 180.131.145.145
8. Klik OK
9. Selesai dech
    Untuk membuktikannya, coba aja buka situs porno…

cara setting dns nawala
Gambar : Cara Setting DNS Nawala

Semoga Bermanfaat....
 

Friday, February 18, 2011

Registry Settings for the Start Menu in Windows XP


  • Policy:Disable the new simple Start Menu

  • Policy:Remove pinned programs list from the Start menu

  • Policy:Remove frequent programs list from the Start Menu

  • Policy:Remove More Programs list from the Start menu

  • Policy:Remove common program groups from Start Menu

  • Policy:Gray unavailable Windows Installer programs Start Menu shortcuts

  • Policy:Disable and remove links to Windows Update

  • Policy:Remove user folders from the Start Menu

  • Policy:Prohibit user from changing user folder paths

  • Policy:Remove My Documents folder from the Start Menu

  • Policy:Prohibit user from changing My Documents path

  • Policy:Remove Recent Documents item from Start Menu

  • Policy:Maximum number of recent documents

  • Policy:Clear history of recent documents on exit

  • Policy:Remove Favorites item from Start Menu

  • Policy:Remove My Computer from the Start Menu

  • Policy:Remove Network Connections from the Start Menu

  • Policy:Remove Network Places from the Star

  • You can use the Group Policy editor, gpedit.msc, to manage XP Start Menu options: User Configuration \ Administrative Templates \ Start Menu and Taskbar
    You can also set them directly via the registry using the registry key:
    HKEY_CURRENT_USER\Software\Microsoft\Windows\CurrentVersion\Policies\Explorer
    The registry entries are DWORD values. A value of 1 is enabled, and a value of 0 is disabled:
    • Policy: Disable the new simple Start Menu
      Description:Disables the new simple Start menu and forces the classic Start menu.
      Registry Value: NoSimpleStartMenu
    • Policy: Remove pinned programs list from the Start menu
      Description:Removes the pinned programs list from the Start menu. Also removes the Internet and E-mail checkboxes from the Start menu customization CPL.
      Registry Value: NoStartMenuPinnedList
    • Policy:Remove frequent programs list from the Start Menu
      Description:Removes the frequently-used programs list from the Start menu.
      Registry Value: NoStartMenuMFUprogramsList
    • Policy:Remove More Programs list from the Start menu
      Description:Removes the More Programs list from the Start menu.
      Registry Value: NoStartMenuMorePrograms
    • Policy:Remove common program groups from Start Menu
      Description:Removes items in the All Users profile from the More Programs list on the Start menu.
      Registry Value: NoCommonGroups
    • Policy:Gray unavailable Windows Installer programs Start Menu shortcuts
      Description:Displays partially installed programs in gray text on the Start menu.
      Registry Value: GreyMSIAds
    • Policy:Disable and remove links to Windows Update
      Description:Removes the Windows Update link from the More Programs list in Start menu, from the Tools menu in IE, and blocks user access to windowsupdate.Microsoft.com.
      Registry Value: NoWindowsUpdate
    • Policy:Remove user folders from the Start Menu
      Description:Removes all user-specific folders except My Documents (My Pictures, My Music, Favorites, and Recent Documents) from the Start menu. Also removes the corresponding checkboxes from the Start menu customization CPL.
      Registry Value:This is a combination of the following: NoStartMenuMyMusic , NoSMMyPictures , NoFavoritesMenu , NoRecentDocsMenu
    • Policy:Prohibit user from changing user folder paths
      Description:Prevents users from changing the path to the My Pictures, My Music, Favorites, and Recent Documents folders.
      Registry Value: DisableMyPicturesDirChange , DisableMyMusicDirChange , DisableFavoritesDirChange .
    • Policy:Remove My Documents folder from the Start Menu
      Description:Removes My Documents folder from the Start menu and corresponding checkbox from the Start menu customization CPL.
      Registry Value: NoSMMyDocs
    • Policy:Prohibit user from changing My Documents path
      Description:Prevents users from changing the path to the My Documents folder.
      Registry Value: DisablePersonalDirChange
    • Policy:Remove Recent Documents item from Start Menu
      Description:Removes the Recent Documents folder from the Start menu. Also removes the corresponding checkbox from the Start menu customization CPL.
      Registry Value: NoRecentDocsMenu
    • Policy:Maximum number of recent documents
      Description:Specifies the number of shortcuts displayed on the Recent Documents submenu.
      Registry Value: MaxRecentDocs
    • Policy:Clear history of recent documents on exit
      Description:Deletes all shortcuts shown in the Recent Documents menu when the user logs off.
      Registry Value: ClearRecentDocsOnExit
    • Policy:Remove Favorites item from Start Menu
      Description:Prevents users from adding the Favorites item to the Start menu. Also removes the corresponding checkbox from the Start menu customization CPL.
      Registry Value: NoFavoritesMenu
    • Policy:Remove My Computer from the Start Menu
      Description:Removes the My Computer item from the Start Menu and the corresponding checkbox from the Start menu customization CPL.
      Registry Value: {20D04FE0-3AEA-1069-A2D8-08002B30309D} under HKCU\Software\Microsoft\Windows\CurrentVersion\Policies\NonEnum.
    • Policy:Remove Network Connections from the Start Menu
      Description:Removes the Network Connections item from the Start menu and the corresponding checkbox from the Start menu customization CPL.
      Registry Value: NoNetworkConnections
    • Policy:Remove Network Places from the Start Menu
      Description:Removes the Network Places item from the Start menu and the corresponding checkbox from the Start menu customization CPL.
      Registry Value: NoStartMenuNetworkPlaces
    • Policy:Do not add shares of recently used documents to Network Places
      Description:Remote shared folders are not added to Network Places whenever you open a document in the shared folder.
      Registry Value: NoRecentDocsNetHood
    • Policy:Remove Help item from Start Menu
      Description:Removes the Help item from the Start menu, but does not disable Help files from running.
      Registry Value: NoSMHelp
    • Policy:Remove Search item from Start Menu
      Description:Removes the Search item from the Start menu and disables some Windows Explorer search elements.
      Registry Value: NoFind
    • Policy:Remove Run item from Start Menu
      Description:Removes the ability to execute programs from the Run option on the Start menu, Task Manager, or by pressing Winkey + R. Also removes the corresponding checkbox from the Start menu customization CPL.
      Registry Value: NoRun
    • Policy:Add "Run in Separate Memory Space" check box to Run dialog box
      Description:Allows 16-bit programs to run in a dedicated Virtual DOS Machine (VDM) process.
      Registry Value: MemCheckBoxInRunDlg
    • Policy:Do not use the search-based method when resolving shell shortcuts
      Description:Prevents the system from conducting a comprehensive search of the target drive to resolve a shortcut.
      Registry Value: NoResolveSearch
    • Policy:Do not use the tracking-based method when resolving shell shortcuts
      Description:Prevents the system from using NTFS features to resolve a shortcut.
      Registry Value: NoResolveTrack
    • Policy:Force Logoff to the Start Menu
      Description:Forces the Logoff button to the Start menu and prevents users from removing the Logoff option from the Start menu.
      Registry Value: ForceStartMenuLogoff
    • Policy:Disable Logoff on the Start Menu
      Description:Removes the "Logoff" button from the Start menu and prevents users from adding the Logoff button to the Start menu.
      Registry Value: StartMenuLogoff
    • Policy:Disable and remove the Turn Off Computer button
      Description:Removes the "Turn Off Computer" button from the Start Menu and prevents shutting down Windows using the standard shutdown user interface.
      Registry Value: NoClose
    • Policy:Disable and remove the Undock PC command
      Description:Removes the "Undock PC" button from the Start Menu and prevents undocking of the PC (laptop).
      Registry Value: NoStartMenuEjectPC
    • Policy:Disable drag-and-drop menus on the Start Menu
      Description:Prevents users from modifying the Start menu by dragging and dropping items. Other methods of customizing the Start menu are still enabled.
      Registry Value: NoChangeStartMenu
    • Policy:Disable changes to Taskbar and Start Menu settings
      Description:Removes the Taskbar & Start Menu item from the Control Panel, and removes the Properties item from the Start menu (and button) context menu.
      Registry Value: NoSetTaskbar
    • Policy:Disable user tracking
      Description:Prevents the system from remembering the programs run, paths followed, and documents used.
      Registry Value: NoInstrumentation
    • Policy:Remove user name from Start Menu
      Description:Removes the user name from the Start menu.
      Registry Value: NoUserNameInStartMenu 
    source: http://www.windowsnetworking.com

    Registry Tricks

    Backup / Restore the Registry
    To Backup/Restore the Windows Registry: Windows 9x For XP 2000 click here
    1. If you are in MSDOS, at the C:\Windows prompt type
    2. Attrib -s -r -h C:\Windows\System.dat (press Enter)
    3. Attrib -s -r -h C:\Windows\User.dat (press Enter)
    To make the backup copies type:
    1. copy C:\Windows\System.dat C:\Windows\System.000 (press Enter)
    2. copy C:\Windows\User.dat C:\Windows\user.000 (press Enter)
    To Restore the Registry
    1. copy C:\Windows\System.000 C:\Windows\System.dat (press Enter)
    2. copy C:\Windows\User.000 C:\Windows\user.dat (press Enter)
    Add Open With to all files
    You can add "Open With..." to the Right click context menu of all files.This is great for when you have several programs you want to open the same file types with. I use three different text editors so I added it to the ".txt" key.
    1. Open RegEdit
    2. Go to HKEY_CLASSES_ROOT\*\Shell
    3. Add a new Key named "OpenWith" by right clicking the "Shell" Key and selecting new
    4. Set the (Default) to "Op&en With..."
    5. Add a new Key named "Command" by right clicking the "OpenWith" Key and selecting new
    6. Set the (Default) to "C:\Windows\rundll32.exe shell32.dll,OpenAs_RunDLL %1", C:\ being your Windows drive. You must enter the "OpenAs_RunDLL %1" exactly this way.
    You can add your name or anything you like that consists of 8 characters or less. This will replace the AM or PM next to the system time. But you can corrupt some trial licenses of software that you may have downloaded.
    1. Open RegEdit
    2. Go to HKEY_CURRENT_USER\Control Panel\International
    3. Add two new String values, "s1159" and "s2359"
    4. Right click the new value name and modify. Enter anything you like up to 8 characters.
    If you enter two different values when modifying, you can have the system tray display the two different values in the AM and PM.
    Lock Out Unwanted Users
    Want to keep people from accessing Windows, even as the default user? If you do not have a domain do not attempt this.
    1. Open RegEdit
    2. Go to HKEY_LOCAL_MACHINE\Network\Logon
    3. Create a dword value "MustBeValidated"
    4. Set the value to 1
    This forced logon can be bypassed in Safe Mode on Windows 9x
    You can make OutLook Express load quicker by disabling the splash screen:
    1. Open RegEdit
    2. Go to HKEY_CURRENT_USER\Software\Microsoft\OutLook Express
    3. Add a string value "NoSplash"
    4. Set the value data to 1 as a Dword value
    To make Windows use multiple Start Menu Columns instead of a single scrolling column, like Windows 9x had, Also if you are using Classic Mode in XP
    1. Open RegEdit
    2. Go to the key
    HKEY_LOCAL_MACHINE\ Software\ Microsoft\ Windows\ CurrentVersion\ Explorer\ Advanced
    3. Create a string value "StartMenuScrollPrograms"
    4. Right click the new string value and select modify
    5. Set the value to "FALSE"
    Changing Windows' Icons
    You can change the Icons Windows uses for folders, the Start Menu, opened and closed folder in the Explorer, and many more.
    1. Open RegEdit
    2. Go to
    HKEY_LOCAL_MACHINE\ Software\ Microsoft\ Windows\ CurrentVersion\ Explorer\ Shell Icons
    3. Add a string value for each Icon you wish to change.
    Example: "3" ="C:\Windows\Icons\MyIcon.ico,0" This will change the closed folders in the Explorer to "MyIcon.ico". Here is a complete list for each value.
    0= Unknown file type
    1= MSN file types
    2= Applications Generic
    3= Closed Folder
    4= Open Folder
    5= 5.25" Drive
    6= 3.25" Drive
    7= Removable Drive
    8= Hard Drive
    9= NetWork Drive
    10= Network Drive Offline
    11= CD-ROM Drive
    12= RAM Drive
    13= Entire Network
    14= Network Hub
    15= My Computer
    16= Printer
    17= Network Neighborhood
    18= Network Workgroup
    19= Start Menu's Program Folders
    20= Start Menu's Documents
    21= Start Menu's Setting
    22= Start Menu's Find
    23= Start Menu's Help
    24= Start Menu's Run
    25= Start Menu's Suspend
    26= Start Menu's PC Undock
    27= Start Menu's Shutdown
    28= Shared
    29= Shortcut Arrow
    30= (Unknown Overlay)
    31= Recycle Bin Empty
    32= Recycle Bin Full
    33= Dial-up Network
    34= DeskTop
    35= Control Panel
    36= Start Menu's Programs
    37= Printer Folder
    38= Fonts Folder
    39= Taskbar Icon
    40= Audio CD
    You need to reboot after making changes. You may need to delete the hidden file ShellIconCache if after rebooting the desired Icons are not displayed.
    Change Default Folder Locations
    You can change or delete the Windows mandatory locations of folder like My Documents:
    1. Open RegEdit
    2. Go to HKEY_CURRENT_USER\ Software\ Microsoft\ Windows\ CurrentVersion\ Explorer\ Shell Folders
    3. Change the desired folder location, My Documents is normally list as "Personal"
    4. Open the Explorer and rename or create the folder you wish.
    To change the desired location of the Program Files folder
    1. Go to
    HKEY_LOCAL_MACHINE\Software\Microsoft\Windows\CurrentVersion
    2. Change the value of "ProgramFiles", or "ProgramFilesDir"
    Now when you install a new program it will default to the new location you have selected.
    Change the Registered Change the User Information
    You can change the Registered Owner or Registered Organization to anything you want even after Windows is installed.
    1) Open RegEdit
    2) Got to
    HKEY_LOCAL_MACHINE\ SOFTWARE\ Microsoft\ Windows\ CurrentVersion.
    3) Change the value of "RegisteredOrganization" or "RegisteredOwner", to what ever you want
    Opening a DOS Window to either the Drive or Directory in Explorer
    Add the following Registry Keys for a Directory:
    HKEY_CLASSES_ROOT\Directory\shell\opennew
    @="Dos Prompt in that Directory"
    HKEY_CLASSES_ROOT\Directory\shell\opennew\command
    @="command.com /k cd %1"
    Add or Edit the following Registry Keys for a Drive:
    HKEY_CLASSES_ROOT\Drive\shell\opennew
    @="Dos Prompt in that Drive"
    HKEY_CLASSES_ROOT\Drive\shell\opennew\command
    @="command.com /k cd %1"
    These will allow you to right click on either the drive or the directory and the option of starting the dos prompt will pop up.
    Changing Exchange/Outlook Mailbox Location
    To change the location of your mailbox for Exchange:
    1. Open RegEdit
    2. Go to
    HKEY_CURRENT_USER\Software\ Microsoft\Windows Messaging Subsystem\ Profiles
    3. Go to the profile you want to change
    4. Go to the value name that has the file location for your mailbox (*.PST) file
    5. Make the change to file location or name
    To change the location of your mailbox for Outlook
    1. Open RegEdit
    2. Go to HKEY_CURRENT_USER\Software\Microsoft\Outlook (or Outlook Express if Outlook Express)
    3. Go to the section "Store Root"
    4. Make the change to file location
    Add/Remove Sound Events from Control Panel
    You can Add and delete sounds events in the Control Panel. In order to do that:
    1. Open RegEdit
    2. Go to HKEY_CURRENT_USER\AppEvents\Schemes\Apps and HKEY_CURRENT_USER\AppEvents\Schemes\Eventlabels. If this key does not exist you can create it and add events.
    3. You can add/delete any items you want to or delete the ones you no longer want.
    Adding an Application to the Right Click on Every Folder
    Here is how to add any application to the Context Menu when you right click on any Folder. This way you do not have to always go to the Start Menu. When you right click on any folder, you can have access to that application, the same as using Sent To.
    1. Open RegEdit
    2. Go to HKEY_CLASSES_ROOT\Folder\shell
    3. Add a new Key to the "Shell" Key and name it anything you like.
    4. Give it a default value that will appear when you right click a folder, i.e. NewKey (use an "&" without the quotes, in front of any character and it will allow you to use the keyboard)
    5. Click on the Key HKEY_CLASSES_ROOT\Folder\shell\NewKey
    6. Add a New Key named Command
    7. Set the (Default) value of the application you want to run
    8. For example: c:\program files\internet explorer\iexplore.exe (Include the full path and parameters if you need them)
    Adding Explore From Here to Every Folder
    When you want to right click on any folder and want to open up an Explorer window of that folder.
    1. Open RegEdit
    2. Go to HKEY_CLASSES_ROOT\Folder\shell
    3. Add a new Key "RootExplore " under the "Shell" Key
    4. Set the (Default) value to "E&xplore From Here "
    5. Right Click the "RootExplore " Key and add a new Key "Command"to the RootExplore
    6. Set the (Default) value of Explorer.exe /e,/root,/idlist,%i
    Changing the Location of Windows' Installation Files
    If you need to change the drive and or path where Windows looks for its installation files:
    1.Open RegEdit
    2.Go to
    HKEY_LOCAL_MACHINE\SOFTWARE\ Microsoft\ Windows\ CurrentVersion\ Setup
    3.Edit the value next to SourcePath
    Creating a Logon Banner
    If you want to create a  Logon Banner: A message box to appear below your logon on.
    1.Open RegEdit
    2.Go To
    For Windows 9x and ME -
    HKEY_LOCAL_MACHINE\SOFTWARE\ Microsoft\ Windows\ CurrentVersion\ Winlogon
    For Windows 2000 XP 2003 Vista -
    HKEY_LOCAL_MACHINE\SOFTWARE\ Microsoft\ Windows\ CurrentVersion\ Winlogon

    3.Create a new String value"LegalNoticeCaption "
    4. Enter the Title of the window. What is displayed in the Title Bar.
    5. Create a new string value "LegalNoticeText"
    6. Enter the text for your message box that will appear even before the Logon window.
    Creating a Default File Opener
    If you have a un-registered file type and want to view it instead of having to select Open With. Use Explorer's Right-click and add your program to the right-click options by:
    1. Open RegEdit
    2. Go to HKEY_CLASSES_ROOT\Unknown\Shell
    3. Right click on "Shell" and create a New Key and name it "Open "
    4. Create a New Key under the "Open" key you just created and name it "Command"
    5. Set the (Default) value to the path and filename of the program you want to use to open the file type
    6. For example: C:\Windows\NOTEPAD.EXE %1
    You must use the "%1" for this to work.and a space between the exe and the %1
    Deleting Registry Keys from the Command Line
    There are two ways to delete a key from the Registry from the Command line. At the Windows Command line:
    RegEdit /l location of System.dat /R location of User.dat /D Registry key to delete
    You cannot be in Windows at the time you use this switch.
    Or you can create a reg file as such:
    REGEDIT4
    [-HKEY_LOCAL_MACHINE\the key you want to delete]
    Note the negative sign just behind the[
    Then at the Command line type:
    1. RegEdit C:\Windows\(name of the regfile).
    Change/Add Restrictions And Features
    If you want to make restrictions to what users can do or use on their computer without having to run Poledit, you can edit the Registry. You can add and delete Windows features in this Key shown below.
    Zero is Off and the value 1 is On. Example: to Save Windows settings add or modify the value name NoSaveSettings to 0, if set to1 Windows will not save settings. And NoDeletePrinter set to 1 will prevent the user from deleting a printer.
    The same key shows up at:
    HKEY_USERS\(yourprofilename)\ Software\ Microsoft\ Windows\ CurrentVersion\ Policies\ Explorer so change it there also if you are using different profiles.
    1.Open RegEdit
    2.Go to
    HKEY_CURRENT_USER\Software\Microsoft\ CurrentVersion\ Policies
    3.Go to the Explorer Key (Additional keys that can be created under Policies are System, Explorer, Network   and WinOldApp )
    4.You can then add DWORD or binary values set to 1 in the appropriate keys for ON and 0 for off.
    NoDeletePrinter - Disables Deletion of Printers
    NoAddPrinter - Disables Addition of Printers
    NoRun - Disables Run Command
    NoSetFolders - Removes Folders from Settings on Start Menu
    NoSetTaskbar - Removes Taskbar from Settings on Start Menu
    NoFind - Removes the Find Command
    NoDrives - Hides Drives in My Computers
    NoNetHood - Hides the Network Neighborhood
    NoDesktop - Hides all icons on the Desktop
    NoClose - Disables Shutdown
    NoSaveSettings - Don't save settings on exit
    DisableRegistryTools - Disable Registry Editing Tools
    NoRecentDocsMenu - Hides the Documents shortcut at the Start button
    NoRecentDocsHistory- Clears history of Documents
    NoFileMenu _ Hides the Files Menu in Explorer
    NoActiveDesktop - No Active Desktop
    NoActiveDesktopChanges- No changes allowed
    NoInternetIcon - No Internet Explorer Icon on the Desktop
    NoFavoritesMenu - Hides the Favorites menu
    NoChangeStartMenu _ Disables changes to the Start Menu
    NoFolderOptions _ Hides the Folder Options in the Explorer
    ClearRecentDocsOnExit - Empty the recent Docs folder on reboot
    NoLogoff - Hides the Log Off .... in the Start Menu
    And here are a few more you can play with
    ShowInfoTip
    NoTrayContextMenu
    NoStartMenuSubFolders
    NoWindowsUpdate
    NoViewContextMenu
    EnforceShellExtensionSecurity
    LinkResolveIgnoreLinkInfo
    NoDriveTypeAutoRun
    NoStartBanner
    NoSetActiveDesktop
    EditLevel
    NoNetConnectDisconnect
    RestrictRun - Disables all exe programs except those listed in the RestrictRun subkey
    This key has many other available keys, there is one to even hide the taskbar, one to hide the control panel and more. I'm not telling you how, as someone may want to play a trick on you. The policies key has a great deal of control over how and what program can run and how one can access what feature.
    In the System key you can enter:
    NoDispCPL - Disable Display Control Panel
    NoDispBackgroundPage - Hide Background Page
    NoDispScrSavPage - Hide Screen Saver Page
    NoDispAppearancePage - Hide Appearance Page
    NoDispSettingsPage - Hide Settings Page
    NoSecCPL - Disable Password Control Panel
    NoPwdPage - Hide Password Change Page
    NoAdminPage - Hide Remote Administration Page
    NoProfilePage - Hide User Profiles Page
    NoDevMgrPage - Hide Device Manager Page
    NoConfigPage - Hide Hardware Profiles Page
    NoFileSysPage - Hide File System Button
    NoVirtMemPage - Hide Virtual Memory Button
    In the Network key you can enter:
    NoNetSetup - Disable the Network Control Panel
    NoNetSetupIDPage - Hide Identification Page
    NoNetSetupSecurityPage - Hide Access Control Page
    NoFileSharingControl - Disable File Sharing Controls
    NoPrintSharing - Disable Print Sharing Controls
    In the WinOldApp key you can enter:
    Disabled - Disable MS-DOS Prompt
    NoRealMode - Disables Single-Mode MS-DOS
    Automatic Screen Refresh
    When you make changes to your file system and use Explorer, the changes are not usually displayed until you press the F5 key
    To refresh automatically:
    1. Open RegEdit
    2. Go to
    HKEY_LOCAL_MACHINE\System\CurrentControlSet\Control\Update
    3. Set the value name "UpdateMode" to 1
    Disable Password Caching
    To disable password caching, which allows for the single Network login and eliminates the secondary Windows logon screen. Either use the same password or:
    1. Open RegEdit
    2. Go to the key
    HKEY_LOCAL_MACHINE\SOFTWARE \Microsoft\ Windows\ CurrentVersion\ Policies\ Network
    3. Add a Dword value "DisablePwdCaching" and set the value to 1
    Changing the MaxMTU for faster Downloads
    There are four Internet settings that can be configured, you can get greater throughput (faster Internet downloads) by modifying a few settings.
    They are the MaxMTU, MaxMSS and DefaultRcvWindow, and DefaultTTL
    1.Open RegEdit
    2.Go to
    HKEY_LOCAL_MACHINE\System\CurrentControlset\ Services\ Class\ net\ 000x
    (where x is your particular network adapter binding.)
    3.Right click on the right panel
    4.Select New\String Value and create the value name IPMTU
    5.Double click on it and enter then the number you want. The usual change is to 576
    6.Similarly, you can add IPMSS and give it a value of 536
    (Windows 9X)You can set DefaultRcvWindow, and DefaultTTL by adding these string values to HKEY_LOCAL_MACHINE\ System\ CurrentControlset\ Services\ VXD\ MSTCP
    Set the DefaultRcvWindow to"5840"and the DefaultTTL to "128"
    Note: These settings will slow down your network access speed slightly, but you will probably not even see the difference if you are using a network card. If you are using Direct Cable you should see a sight difference.
    Adding Items to the Start Button
    To add items when you right-click on the Start Button:
    1.Open RegEdit
    2.Go to HKEY_CLASSES_ROOT\Directory\Shell
    3.Right-click on Shell and select New Key
    4.Type in the name of the key and press the Enter key
    5.In the Default name that shows in the right hand panel, you can add a title with a "&" character in front of the letter for a shortcut
    6.Right-click on the key you just created and create another key under it called command
    7.For the value of this command, enter the full path and program you want to execute
    8.Now when you right click on the Start Button, your new program will be there.
    9.For example, if you want Word to be added, you would add that as the first key, the default in the right panel would be &Word so when you right click on the Start Button, the W would be the Hot Key on your keyboard. The value of the key would be C:\Program Files\Office\Winword\Winword.exe
    Remove Open, Explore & Find from Start Button
    When you right click on the Start Button, you can select Open, Explore or Find.
    Open shows your Programs folder. Explore starts the Explorer and allows access to all drives.
    Find allows you to search and then run programs. In certain situations you might want to disable this feature.
    To remove them:
    1.Open RegEdit
    2.Go to HKEY_CLASSES_ROOT\Directory\Shell\Find
    3.Delete Find
    4.Scroll down below Directory to Folder
    5.Expand this section under shell
    6.Delete Explore and Open
    Caution: - When you remove Open, you cannot open any folders.
    Removing Items from NEW Context Menu
    When you right-click on the desktop and select New, or use the File Menu item in the Explore and select New a list of default templates you can open up are listed.
    To remove items from that list:
    1. Open RegEdit
    2. Do a Search for the string ShellNew in the HKEY_CLASSES_ROOT Hive
    3. Delete the ShellNew command key for the items you want to remove.
    Changing Telnet Window
    You can view more data if you increase the line count of Telnet. By Default it has a window size of 25 lines. To increase this so you can scroll back and look at a larger number on lines:
    1. Open RegEdit
    2. Go to HKEY_CURRENT_USER\Software\Microsoft\Telnet
    3. Modify the value data of "Rows"
     Changing the Tips of the Day
    You can edit the Tips of the day in the Registry by going to:
    HKEY_LOCAL_MACHINE\SOFTWARE\Microsoft\ Windows\ CurrentVersion\ explorer\ Tips
    Disabling Drives in My Computer
    To turn off the display of local or networked drives when you click on My Computer:
    1.Open RegEdit
    2.Go to
    HKEY_CURRENT_USER\Software\ Microsoft\ Windows\ CurrentVersion\ Policies\ Explorer
    3.Add a New DWORD item and name it NoDrives
    4.Give it a value of 3FFFFFF
    5.Now when you click on My Computer, none of your drives will show.
    Change the Caption on the Title Bar for OutLook Express or the Internet Explorer:
    For Outlook Express:
    1. Open RegEdit
    2. Go to
    HKEY_CURRENT_USER\Software\Microsoft\OutLook Express
    For IE5 and up use:
    HKEY_CURRENT_USER\IDENTITIES \{9DDDACCO-38F2-11D6-93CA-812B1F3493B}\ SOFTWARE\ MICROSOFT\ OUTLOOK EXPRESS\5.0
    3. Add a string value "WindowTitle" (no space)
    4. Modify the value to what ever you like.
    For no splash screen, add a dword value "NoSplash" set to 1
    The Key {9DDDACCO-38F2-11D6-93CA-812B1F3493B} can be any key you find here. Each user has his own Key number.
    The Key 5.0 is whatever version of IE you have

    For Internet Explorer:
    1. Open RegEdit
    2. Go to HKEY_LOCAL_MACHINE\Software\Microsoft\Internet Explorer\Main
    3. Add a string value "Window Title" (use a space)
    4. Modify the value to what ever you like.
    Disabling the Right-Click on the Start Button
    Normally, when you right button click on the Start button, it allows you to open your programs folder, the Explorer and run Find.
    In situations where you don't want to allow users to be able to do this in order to secure your computer.
    1.Open RegEdit
    2.Search for Desktop
    3.This should bring you to HKEY_CLASSES_ROOT\Directory
    4.Expand this section
    5.Under Shell is Find
    6.Delete Find
    7.Move down a little in the Registry to Folder
    8.Expand this section and remove Explore and Open
    Now when you right click on the Start button, nothing should happen.
    You can delete only those items that you need.
    Note: - On Microsoft keyboards, this also disables the Window-E (for Explorer) and Window-F
    (for Find) keys.
    See the section on Installation in the RESKIT to see how to do this automatically during an install.
    Disabling My Computer
    In areas where you are trying to restrict what users can do on the computer, it might be beneficial to disable the ability to click on My Computer and have access to the drives, control panel etc.
    To disable this:
    1.Open RegEdit
    2.Search for 20D04FE0-3AEA-1069-A2D8-08002B30309D
    3.This should bring you to the HKEY_CLASSES_ROOT\CLSID section
    4.Delete the entire section.
    Now when you click on My Computer, nothing will happen.
    You might want to export this section to a Registry file before deleting it just in case you want to enable it again. Or you can rename it to 20D0HideMyComputer4FE0-3AEA-1069-A2D8-08002B30309D. You can also hide all the Desktop Icons, see Change/Add restrictions.
    Opening Explorer from My Computer
    By default, when you click on the My Computer icon, you get a display of all your drives, the Control Panel etc. If you would like to have this open the Explorer:
    1. Open RegEdit
    2. Go to
    HKEY_CLASSES_ROOT\CLSID\ {20D04FE0-3AEA-1069-A2D8-08002B30309D}\ Shell
    3 . Add a new Key named "Open" if it does not exists by right clicking "Shell" and selecting new.
    4. . Add a new Key named "Command" by right clicking "Open" and selecting new
    5. Set the (Default) value for the Command Key to "Explorer.exe" or "C:\Windows\Explorer.exe"
    Recycle Bin Edits
    Fooling with the recycle bin. Why not make the icon context menu act like other icon context menus.
    Add rename to the menu:
    HKEY_CLASSES_ROOT\CLSID\ {645FF040-5081-101B-9F08-00AA002F954E}\ ShellFolder
    "Attributes"=hex:50,01,00,20
    Add delete to the menu:
    HKEY_CLASSES_ROOT\CLSID\ {645FF040-5081-101B-9F08-00AA002F954E}\ ShellFolder
    "Attributes"=hex:60,01,00,20
    Add rename and delete to the menu:
    HKEY_CLASSES_ROOT\CLSID\ {645FF040-5081-101B-9F08-00AA002F954E} \ShellFolder
    "Attributes"=hex:70,01,00,20
    Restore the recycle bin to Windows defaults including un-deleting the icon after deletion:
    Restore the icon.
    HKEY_LOCAL_MACHINE\SOFTWARE\ Microsoft\ Windows \CurrentVersion\ explorer\
    Desktop\NameSpace\{645FF040-5081-101B-9F08-00AA002F954E}
    @="Recycle Bin"
    Reset Windows defaults.
    HKEY_CLASSES_ROOT\CLSID\ {645FF040-5081-101B-9F08-00AA002F954E} \ShellFolder
    "Attributes"=hex:40,01,00,20
    Other edits to the recycle bin icon:
    HKEY_CLASSES_ROOT\CLSID\ {645FF040-5081-101B-9F08-00AA002F954E}\ ShellFolder
    "Attributes"=hex:40,01,01,20 ... standard shortcut arrow
    "Attributes"=hex:40,01,02,20 ... a different shortcut arrow
    "Attributes"=hex:40,01,04,20 ... and still another shortcut arrow
    "Attributes"=hex:40,01,08,20 ... make it look disabled (like it's been cut) 
    For Windows XP and 2000 also edit HKEY_CURRENT_USER\ Software\ Microsoft\ Windows\ CurrentVersion\ Explorer\ CLSID\ {645FF040-5081-101B-9F08-00AA002F954E}
    For Windows ME also edit HKEY_CURRENT_USER \Software\ Classes\ CLSID\ {645FF040-5081-101B-9F08-00AA002F954E}

    Setting the Minimum Password Length
    1.Open RegEdit
    2.Go to
    HKEY_LOCAL_MACHINE\ SOFTWARE\ Microsoft\ Windows\ CurrentVersion\ Policies\ Network
    3. Now, choose the Edit/New/Binary value command and call the new value MinPwdLen. Press Enter twice and Assign it a value equal to your minimum password length.
    Add\delete programs to run every time Windows starts
    You can start or stop programs from executing at boot up by adding or deleting them to/from the run Keys in the Registry. Windows loads programs to start in the following order; Program listed in the Local Machine hive, then the Current User hive, then theWin.ini Run= and Load = lines. then finally programs in your Start Up folder.
    To add or remove programs in the Registry
    1.Open RegEdit
    2.Go to the desired Key
    HKEY_LOCAL_MACHINE\SOFTWARE\Microsoft\Windows \CurrentVersion \Run
    HKEY_LOCAL_MACHINE\SOFTWARE\Microsoft\Windows \CurrentVersion \RunServices
    HKEY_CURRENT_USER\SOFTWARE\Microsoft\Windows \CurrentVersion \Run
    HKEY_CURRENT_USER\SOFTWARE\Microsoft\Windows \CurrentVersion \RunServices
    3. Add a new String Value and name it anything you like
    4. For the value data, enter the path and executable for the program you want to run.
    By adding the value to the HKEY_CURRENT_USER hive instead allows the program to start only when that user is logged on.
    If you add the value to the RunOnce key the program will run once and be removed from the key by Windows.
    Removing the Shortcut Icon Arrows
    1.Open RegEdit
    2.Open the Key HKEY_CLASSES_ROOT
    3.Open the Key LNKFILE
    4.Delete the value IsShortcut
    5.Open the next Key PIFFILE
    6.Delete the value IsShortcut
    7.Restart the Windows
    Turn Off Window Animation
    You can shut off the animation displayed when you minimize and maximize Windows.
    1. Open RegEdit
    2. Go to HKEY_CURRENT_USER\Control panel \Desktop\ WindowMetrics
    3. Create a new string value "MinAnimate".
    4. Set the value data of 0 for Off or 1 for On
    Changing your Modem's Initialization String
    1.Open RegEdit
    2.Go to
    HKEY_LOCAL_MACHINE\System\CurrentControlSet \Services \Class \Modem \0000 \Init
    3.Change the settings to the new values
    Increasing the Modem Timeout
    If your modem it is timing out during file transfers or loading Web Pages, you might try increasing the timeout period. To change the Time Out::
    1.Open RegEdit
    2.Go to HKEY_LOCAL_MACHINE\System\CurrentControlSet\ Services\ Class\ Modem\ XXXX\ Settings Where XXXX is the number of your modem
    3. In the right panel and double click on Inactivity Timeout
    4.The number of minutes for a timeout should be entered between the brackets.
    5.For example, a setting could have S19=<10> to set it to 10 minutes.
    Removing Programs from Control Panel's Add/Remove Programs Section
    If you uninstalled a program by deleting the files, it may still show up in the Add/Remove programs list in the Control Panel.
    In order to remove it from the list.
    1.Open RegEdit
    2.Go to HKEY_LOCAL_MACHINE\ SOFTWARE\ Microsoft\ Windows\ CurrentVersion\ Uninstall
    3.Delete any programs here.
    If you have a problem locating the desired program open each key and view the DisplayName value
    The Fix for Grayed Out Boxes
    The File Types tab in Explorer's View / Options menu lets you edit most of your file types, but certain settings cannot be changed. The default action for a batch file, for instance, runs the batch file instead of opening it via Notepad or Wordpad. Thus, when you double-click on AUTOEXEC.BAT, a DOS window opens, and the file executes. If you want to change this default action and edit a batch file when you double-click on it, however, the File Types tab does not let you do so; the Set Default button for the file type called MS-DOS Batch File is always grayed out.
    The button is grayed out because HKEY_CLASSES_ROOT's batfile key contains an EditFlag value entry. Such entries are used throughout the Registry to prevent novice users from altering certain system settings. The binary data in batfile's EditFlag reads d0 04 00 00. If you change this value to 00 00 00 00, you can then change any of the batch file settings. Do not, however, indiscriminately zero out EditFlag; if you do so in a system ProgID such as Drive or AudioCD, it completely disappears from the File Types list. For ProgIDs that are linked to extensions, set all EditFlags to 00 00 00 00. For system ProgIDs, replace EditFlag data with 02 00 00 00.
    If you wish to have access to some buttons while leaving others grayed out, you must know the function of each EditFlag bit. The last two bytes of data are always zero, but most bits within the first two bytes have a specific effect:
    • Byte 1, bit 1: Removes the file type from the master list in the File Types tab (select View / Options under Explorer) if it has an associated extension.
    • Byte 1, bit 2: Adds the file type to the File Types tab if it does not have an associated extension.
    • Byte 1, bit 3: Identifies a type with no associated extension.
    • Byte 1, bit 4: Grays out the Edit button in the File Types tab.
    • Byte 1, bit 5: Grays out the Remove button in the File Types tab.
    • Byte 1, bit 6: Grays out the New button in the Edit File Type dialog (select the Edit button in the File Types tab).
    • Byte 1, bit 7: Grays out the Edit button in the Edit File Type dialog.
    • Byte 1, bit 8: Grays out the Remove button in the Edit File Type dialog.
    • Byte 2, bit 1: Prevents you from editing a file type's description in the Edit File Type dialog.
    • Byte 2, bit 2: Grays out the Change Icon button in the Edit File Type dialog.
    • Byte 2, bit 3: Grays out the SetDefault button in the Edit File Type dialog.
    • Byte 2, bit 4: Prevents you from editing an action's description in the Edit Action dialog (select the Edit button in the Edit File Type dialog).
    • Byte 2, bit 5: Prevents you from editing the command line in the Edit Action dialog.
    • Byte 2, bit 6: Prevents you from setting DDE (Dynamic Data Exchange) fields in the Edit Action dialog.
    The EditFlags value for Drive, for instance, is d2 01 00 00 in Hex (1101 0010 0000 0001 in binary). Bits 2, 5, 7, and 8 are on in byte 1, and bit 1 is on in byte 2. The EditFlag for batfile is d0 04 00 00 in Hex or 1101 0000 0000 0100 in binary. In this case, bits 5, 7, and 8 are on in byte 1, and bit 3 is on in byte 2.
    Bits 4, 5, and 6 of byte 2 apply only to actions that are protected. EditFlags with action keys (such as HKEY_CLASSES_ROOT\batfile\shell\open) determine protection. If byte 1, bit 1 of such an EditFlag is 0 (or if there is no EditFlag), then the action is protected. If byte 1, bit 1 is 1, then the action is unprotected.
    Protection on system files
    To enable protection on system files such as the KnownDLLs list, add the  following value;
    1. Open RegEdit
    2. HKEY_LOCAL_MACHINE\System\CurrentControlSet\ Control\ SessionManager
    3. Create the a Dword value and name it "ProtectionMode "
    4. Set the Value to1

    Sunday, January 23, 2011

    Virtual-Key Codes

    The following table shows the symbolic constant names, hexadecimal values, and mouse or keyboard equivalents for the virtual-key codes used by the system. The codes are listed in numeric order.
    Constant/valueDescription

    VK_LBUTTON
    0x01
    Left mouse button

    VK_RBUTTON
    0x02
    Right mouse button

    VK_CANCEL
    0x03
    Control-break processing

    VK_MBUTTON
    0x04
    Middle mouse button (three-button mouse)

    VK_XBUTTON1
    0x05
    X1 mouse button

    VK_XBUTTON2
    0x06
    X2 mouse button

    -
    0x07
    Undefined

    VK_BACK
    0x08
    BACKSPACE key

    VK_TAB
    0x09
    TAB key

    -
    0x0A-0B
    Reserved

    VK_CLEAR
    0x0C
    CLEAR key

    VK_RETURN
    0x0D
    ENTER key

    -
    0x0E-0F
    Undefined

    VK_SHIFT
    0x10
    SHIFT key

    VK_CONTROL
    0x11
    CTRL key

    VK_MENU
    0x12
    ALT key

    VK_PAUSE
    0x13
    PAUSE key

    VK_CAPITAL
    0x14
    CAPS LOCK key

    VK_KANA
    0x15
    IME Kana mode

    VK_HANGUEL
    0x15
    IME Hanguel mode (maintained for compatibility; use VK_HANGUL)

    VK_HANGUL
    0x15
    IME Hangul mode

    -
    0x16
    Undefined

    VK_JUNJA
    0x17
    IME Junja mode

    VK_FINAL
    0x18
    IME final mode

    VK_HANJA
    0x19
    IME Hanja mode

    VK_KANJI
    0x19
    IME Kanji mode

    -
    0x1A
    Undefined

    VK_ESCAPE
    0x1B
    ESC key

    VK_CONVERT
    0x1C
    IME convert

    VK_NONCONVERT
    0x1D
    IME nonconvert

    VK_ACCEPT
    0x1E
    IME accept

    VK_MODECHANGE
    0x1F
    IME mode change request

    VK_SPACE
    0x20
    SPACEBAR

    VK_PRIOR
    0x21
    PAGE UP key

    VK_NEXT
    0x22
    PAGE DOWN key

    VK_END
    0x23
    END key

    VK_HOME
    0x24
    HOME key

    VK_LEFT
    0x25
    LEFT ARROW key

    VK_UP
    0x26
    UP ARROW key

    VK_RIGHT
    0x27
    RIGHT ARROW key

    VK_DOWN
    0x28
    DOWN ARROW key

    VK_SELECT
    0x29
    SELECT key

    VK_PRINT
    0x2A
    PRINT key

    VK_EXECUTE
    0x2B
    EXECUTE key

    VK_SNAPSHOT
    0x2C
    PRINT SCREEN key

    VK_INSERT
    0x2D
    INS key

    VK_DELETE
    0x2E
    DEL key

    VK_HELP
    0x2F
    HELP key


    0x30
    0 key


    0x31
    1 key


    0x32
    2 key


    0x33
    3 key


    0x34
    4 key


    0x35
    5 key


    0x36
    6 key


    0x37
    7 key


    0x38
    8 key


    0x39
    9 key

    -
    0x3A-40
    Undefined


    0x41
    A key


    0x42
    B key


    0x43
    C key


    0x44
    D key


    0x45
    E key


    0x46
    F key


    0x47
    G key


    0x48
    H key


    0x49
    I key


    0x4A
    J key


    0x4B
    K key


    0x4C
    L key


    0x4D
    M key


    0x4E
    N key


    0x4F
    O key


    0x50
    P key


    0x51
    Q key


    0x52
    R key


    0x53
    S key


    0x54
    T key


    0x55
    U key


    0x56
    V key


    0x57
    W key


    0x58
    X key


    0x59
    Y key


    0x5A
    Z key

    VK_LWIN
    0x5B
    Left Windows key (Natural keyboard)

    VK_RWIN
    0x5C
    Right Windows key (Natural keyboard)

    VK_APPS
    0x5D
    Applications key (Natural keyboard)

    -
    0x5E
    Reserved

    VK_SLEEP
    0x5F
    Computer Sleep key

    VK_NUMPAD0
    0x60
    Numeric keypad 0 key

    VK_NUMPAD1
    0x61
    Numeric keypad 1 key

    VK_NUMPAD2
    0x62
    Numeric keypad 2 key

    VK_NUMPAD3
    0x63
    Numeric keypad 3 key

    VK_NUMPAD4
    0x64
    Numeric keypad 4 key

    VK_NUMPAD5
    0x65
    Numeric keypad 5 key

    VK_NUMPAD6
    0x66
    Numeric keypad 6 key

    VK_NUMPAD7
    0x67
    Numeric keypad 7 key

    VK_NUMPAD8
    0x68
    Numeric keypad 8 key

    VK_NUMPAD9
    0x69
    Numeric keypad 9 key

    VK_MULTIPLY
    0x6A
    Multiply key

    VK_ADD
    0x6B
    Add key

    VK_SEPARATOR
    0x6C
    Separator key

    VK_SUBTRACT
    0x6D
    Subtract key

    VK_DECIMAL
    0x6E
    Decimal key

    VK_DIVIDE
    0x6F
    Divide key

    VK_F1
    0x70
    F1 key

    VK_F2
    0x71
    F2 key

    VK_F3
    0x72
    F3 key

    VK_F4
    0x73
    F4 key

    VK_F5
    0x74
    F5 key

    VK_F6
    0x75
    F6 key

    VK_F7
    0x76
    F7 key

    VK_F8
    0x77
    F8 key

    VK_F9
    0x78
    F9 key

    VK_F10
    0x79
    F10 key

    VK_F11
    0x7A
    F11 key

    VK_F12
    0x7B
    F12 key

    VK_F13
    0x7C
    F13 key

    VK_F14
    0x7D
    F14 key

    VK_F15
    0x7E
    F15 key

    VK_F16
    0x7F
    F16 key

    VK_F17
    0x80H
    F17 key

    VK_F18
    0x81H
    F18 key

    VK_F19
    0x82H
    F19 key

    VK_F20
    0x83H
    F20 key

    VK_F21
    0x84H
    F21 key

    VK_F22
    0x85H
    F22 key

    VK_F23
    0x86H
    F23 key

    VK_F24
    0x87H
    F24 key

    -
    0x88-8F
    Unassigned

    VK_NUMLOCK
    0x90
    NUM LOCK key

    VK_SCROLL
    0x91
    SCROLL LOCK key


    0x92-96
    OEM specific

    -
    0x97-9F
    Unassigned

    VK_LSHIFT
    0xA0
    Left SHIFT key

    VK_RSHIFT
    0xA1
    Right SHIFT key

    VK_LCONTROL
    0xA2
    Left CONTROL key

    VK_RCONTROL
    0xA3
    Right CONTROL key

    VK_LMENU
    0xA4
    Left MENU key

    VK_RMENU
    0xA5
    Right MENU key

    VK_BROWSER_BACK
    0xA6
    Browser Back key

    VK_BROWSER_FORWARD
    0xA7
    Browser Forward key

    VK_BROWSER_REFRESH
    0xA8
    Browser Refresh key

    VK_BROWSER_STOP
    0xA9
    Browser Stop key

    VK_BROWSER_SEARCH
    0xAA
    Browser Search key

    VK_BROWSER_FAVORITES
    0xAB
    Browser Favorites key

    VK_BROWSER_HOME
    0xAC
    Browser Start and Home key

    VK_VOLUME_MUTE
    0xAD
    Volume Mute key

    VK_VOLUME_DOWN
    0xAE
    Volume Down key

    VK_VOLUME_UP
    0xAF
    Volume Up key

    VK_MEDIA_NEXT_TRACK
    0xB0
    Next Track key

    VK_MEDIA_PREV_TRACK
    0xB1
    Previous Track key

    VK_MEDIA_STOP
    0xB2
    Stop Media key

    VK_MEDIA_PLAY_PAUSE
    0xB3
    Play/Pause Media key

    VK_LAUNCH_MAIL
    0xB4
    Start Mail key

    VK_LAUNCH_MEDIA_SELECT
    0xB5
    Select Media key

    VK_LAUNCH_APP1
    0xB6
    Start Application 1 key

    VK_LAUNCH_APP2
    0xB7
    Start Application 2 key

    -
    0xB8-B9
    Reserved

    VK_OEM_1
    0xBA
    Used for miscellaneous characters; it can vary by keyboard.
    For the US standard keyboard, the ';:' key

    VK_OEM_PLUS
    0xBB
    For any country/region, the '+' key

    VK_OEM_COMMA
    0xBC
    For any country/region, the ',' key

    VK_OEM_MINUS
    0xBD
    For any country/region, the '-' key

    VK_OEM_PERIOD
    0xBE
    For any country/region, the '.' key

    VK_OEM_2
    0xBF
    Used for miscellaneous characters; it can vary by keyboard.
    For the US standard keyboard, the '/?' key

    VK_OEM_3
    0xC0
    Used for miscellaneous characters; it can vary by keyboard.
    For the US standard keyboard, the '`~' key

    -
    0xC1-D7
    Reserved

    -
    0xD8-DA
    Unassigned

    VK_OEM_4
    0xDB
    Used for miscellaneous characters; it can vary by keyboard.
    For the US standard keyboard, the '[{' key

    VK_OEM_5
    0xDC
    Used for miscellaneous characters; it can vary by keyboard.
    For the US standard keyboard, the '\|' key

    VK_OEM_6
    0xDD
    Used for miscellaneous characters; it can vary by keyboard.
    For the US standard keyboard, the ']}' key

    VK_OEM_7
    0xDE
    Used for miscellaneous characters; it can vary by keyboard.
    For the US standard keyboard, the 'single-quote/double-quote' key

    VK_OEM_8
    0xDF
    Used for miscellaneous characters; it can vary by keyboard.

    -
    0xE0
    Reserved


    0xE1
    OEM specific

    VK_OEM_102
    0xE2
    Either the angle bracket key or the backslash key on the RT 102-key keyboard


    0xE3-E4
    OEM specific

    VK_PROCESSKEY
    0xE5
    IME PROCESS key


    0xE6
    OEM specific

    VK_PACKET
    0xE7
    Used to pass Unicode characters as if they were keystrokes. The VK_PACKET key is the low word of a 32-bit Virtual Key value used for non-keyboard input methods. For more information, see Remark in KEYBDINPUT, SendInput, WM_KEYDOWN, and WM_KEYUP

    -
    0xE8
    Unassigned


    0xE9-F5
    OEM specific

    VK_ATTN
    0xF6
    Attn key

    VK_CRSEL
    0xF7
    CrSel key

    VK_EXSEL
    0xF8
    ExSel key

    VK_EREOF
    0xF9
    Erase EOF key

    VK_PLAY
    0xFA
    Play key

    VK_ZOOM
    0xFB
    Zoom key

    VK_NONAME
    0xFC
    Reserved

    VK_PA1
    0xFD
    PA1 key

    VK_OEM_CLEAR
    0xFE
    Clear key

    Requiremen

    Minimum supported clientWindows 2000 Professional
      Minimum supported serverWindows 2000 Server
    HeaderWinuser.h

    Friday, January 14, 2011

    How to use the remote shutdown command in Windows

    This article will show you how to use the remote shutdown command tool in Windows to remotely shut down, restart, or logoff a local or networked computer. This can be very useful sometimes if you have multiple computers at home or on your network that you want to quickly shutdown or restart.
    You can perform a remote shutdown from the command prompt using the shutdown command and it’s associated switches, from the remote shutdown dialog box, or from a batch file. I’ll try to go through all three in this guide.

    Remote Shutdown Overview

    Firstly, in order to remotely shutdown a computer on your network, you’ll need to make sure you have Administrative access to that computer. If you’re on a home network, the best way to do this is to make sure all computers are in the same workgroup and that they all have at least one Administrator account with the same user name and password.
    You can also have different Administrator account names across computers, but then you’ll need to make sure you add the Administrator account of one computer to the account list on the other computers. You’ll also need to know all the names of the other computers on the network. You can do that by going to Control Panel and then clicking on System. Then click on the Computer Name tab.
    computer name
    Remote shutdown is useful for managing multiple computers at once and especially useful for helpdesk technicians when they have to fix remote computers.

    Remote shutdown via Command Prompt

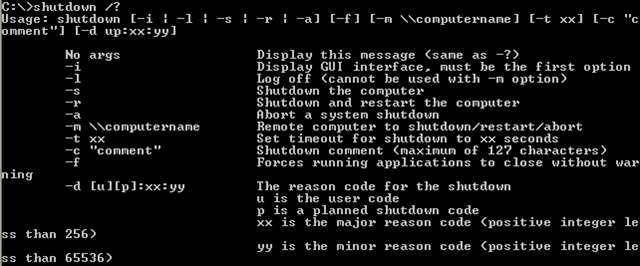
    The shutdown command is most flexible when using it from the command prompt because you can add a bunch of switches to it, which allow you to customize the behavior. Go to Start, then Run, and type in CMD. In the black command window, type in shutdown /? to see the list of switches.
    shutdown command
    You have to use at least one switch in order for the command to do anything. Basically you would type in shutdown -X -Y -Z where X, Y, Z are letters in the list above.
    Here are a couple of the most command switches and what actions they peform:
    -l: Logs off the computer
    -s: Shuts down the computer
    -r: Restarts the computer
    -m \\computername: remote shutdown of a computer
    -f: Forces programs to close immediately
    So for remotely shutting down another machine on your network, you would type into the command prompt the following commands:
    shutdown –m \\computername –r –f
    This above command will restart the computer named computername and force all programs that are still running to die.
    shutdown –m \\computername –r –f –c “The computer will restart, please save all work.” –t 60
    This command will restart the computer named computername, force all programs that are running to die, show a message to the user, and countdown 60 seconds before it restarts.

    Remote Shutdown via Shutdown Dialog

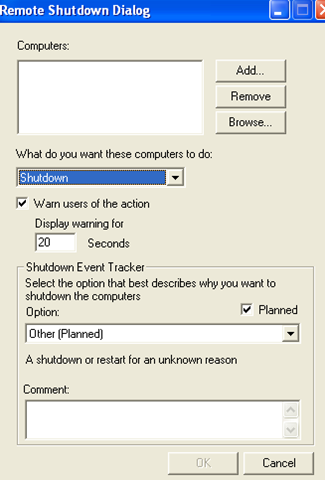
    If you don’t like all those switches, etc, or using the command prompt, then you can bring up the shutdown dialog box. You can open the dialog window by clicking Start, click Run, type CMD and typing shutdown -i and in the blank DOS window.
    shutdown i
    A window similar to the one below will appear:
    remote shutdown dialog
    Click the Add or Browse button to add computers to the list. You can then run the commands on the entire batch of computers. If you click Add, you’ll need to enter in the network name of the computer in the format \\computername. You can even add your own computer to test it out and make sure it works.
    computer name[6]
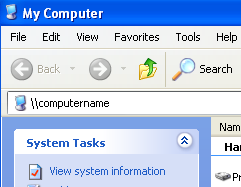
    Of course, you need to know the actual computer name, which I mentioned how you can figure out above. You’ll also need Administrative access. You can determine this by going to My Computer and typing \\computername into the address bar and seeing if you can get access without having to be prompted for a password.
    compute name my
    So add as many computers to the list as you like and then set your options. You can shutdown, restart, or logoff. You can also display a warning for however many seconds you like. You can type in a comment at the bottom which will be displayed to users. That’s it!

    Remote Shutdown via Batch File

    Finally, you can create a batch file so that you can do all of this by just clicking on a file! Or you can even schedule the batch file to be run at specific intervals using Windows Scheduler.
    Just go to Notepad and type in the commands you would have typed into the command prompt:
    shutdown –m \\computername1 –r
    shutdown –m \\computername2 –r
    shutdown –m \\computername3 –r
    This will restart three computers on my home network. You would of course replace computername1 with the actual names of your computers. Then simple save the file with a .BAT file extension. You can put as many commands into the batch file as you like, so feel free to experiment!
    I’ve written an extensive post on how to use batch files in Windows, so read that if you are not familiar with batch files. Enjoy!
    [tags]remote shutdown, remote shutdown command, remote windows shutdown, remote windows xp shutdown, network remote shutdown, remote computer shutdown[/tags]

    Wednesday, January 12, 2011

    Automatic Logon Into Windows 7

    If you want to further speed up the Windows 7 boot process you could configure the computer system to automatically logon the user. This is especially for computer systems that are in use by only one person as it would not even be a privacy or security risk.
    All that needs to be done to configure Windows 7 for automatic logon is the following:
    Press Windows R. A command box should appear. Type control userpasswords2 and hit the enter key. This should display the User Accounts screen in Windows 7. Select the user account in the main table and uncheck the “Users must enter a user name and password to use this computer. A click on the Apply button will open the Automatically Log On window. Enter the password and confirm it to add the password to the system so that it does not need to be entered during logon.
    U can get same result just typing netplwiz in Command Prompt :)

    Monday, January 10, 2011

    Disable Windows Key

    Now you can disable your Windows key in Windows... without any special software, and without having to pry the key off with a screwdriver. Read on to find out how

    Background

    Accidentally hitting the Windows key while in the middle of playing a game can be maddening, and will most likely get you killed mid-game. Now, you can disable it by modifying the windows registry. I decided to add some .REG files so you can disable your Windows key yourself without needing to muck around with the registry.

    Compatibility

    This method of disabling the Windows key works with all modern Windows variants: Windows 2000, Windows XP Pro & Home and Windows 2003. It will not work with older versions.

    Warnings

    • These files are provided without warranty. Use them at your own risk.
    • These files will overwrite any keyboard mappings you currently have.
    • .REG files update your Windows registry. Incorrect changes to the registry may damage Windows or other installed software. Be sure you know what a given .REG file contains before merging it into the registry.

    Installation / Files

    The following files are .reg files. They modify the Windows registry directly. You should download them to your PC and then double-click them to add them to your registry. After saying YES to the message box, reboot your machine and enjoy freedom from Windows key-induced loss of life annoyances.

    Just make .reg files for the following scene:

    Disable left Windows key:
    Windows Registry Editor Version 5.00

    [HKEY_LOCAL_MACHINE\SYSTEM\CurrentControlSet\Control\Keyboard Layout]
    "Scancode Map"=hex:00,00,00,00,00,00,00,00,02,00,00,00,00,00,5B,E0,00,00,00,00

    Disable right Windows key:
    Windows Registry Editor Version 5.00

    [HKEY_LOCAL_MACHINE\SYSTEM\CurrentControlSet\Control\Keyboard Layout]
    "Scancode Map"=hex:00,00,00,00,00,00,00,00,02,00,00,00,00,00,5C,E0,00,00,00,00

    Disable both Windows keys
    Windows Registry Editor Version 5.00

    [HKEY_LOCAL_MACHINE\SYSTEM\CurrentControlSet\Control\Keyboard Layout]
    "Scancode Map"=hex:00,00,00,00,00,00,00,00,03,00,00,00,00,00,5B,E0,00,00,5C,E0,00,00,00,00

    Disable Caps Lock and both Windows keys:
    Windows Registry Editor Version 5.00

    [HKEY_LOCAL_MACHINE\SYSTEM\CurrentControlSet\Control\Keyboard Layout]
    "Scancode Map"=hex:00,00,00,00,00,00,00,00,04,00,00,00,00,00,5B,E0,00,00,5C,E0,00,00,3A,00,00,00,00,00

    UNINSTALL: Restore Windows keys
    Windows Registry Editor Version 5.00

    [HKEY_LOCAL_MACHINE\SYSTEM\CurrentControlSet\Control\Keyboard Layout]
    "Scancode Map"=-

    Saturday, January 8, 2011

    Customize Windows Vista & 7 Start Menu & TaskBar with Registry Hacks.

    Type regedit in Vista's start menu search box and hit enter to open the registry editor.
    Navigate to the following key:
    HKEY_CURRENT_USER\Software\Microsoft\Windows\CurrentVersion\Policies\Explorer
    Here you will see a lot of DWORD valuenames.
    To customize your start menu options, you have to modify the DWORD value data and set it to either 0 or 1. To modify the value data, you rt click on the name and select modify. Then in the value data box, you set its numeric value.
    Setting the value of respective DWORD to 1, means that it will have the effect as described in the Value Name.
    Setting the value of respective DWORD to 0, means that it will have the OPPOSITE effect as described in the Value Name.
    If the DWORD ValueNames do not exist, you will have to create them. To create them, rt click in any blank space in RHS Panel > New >Dword value.
    The following are some of the recognized DWORD ValueNames.
    NoTrayItemsDisplay : Hides the Task Bar notification area
    NoToolbarsOnTaskbar : Do not display any custom toolbars in the taskbar
    QuickLaunchEnabled : Enable QuickLaunch bar display in the TaskBar
    NoSimpleStartMenu : Disabling it will force the Classic Start Menu
    NoStartMenuPinnedList : Remove Pinned Programs list from the Start Menu
    NoStartMenuMorePrograms : Remove “All Programs” list from the Start menu
    NoStartMenuMyGanes : Remove Games from Start Menu
    NoStartMenuMyMusic : Remove Music from Start Menu
    NoStartMenuNetworkPlaces : Remove Network from Start Menu
    NoTaskGrouping : Prevent grouping of Task Bar items
    HideClock : Hides from the Task Bar notification area
    NoSMBalloonTip : Remove Balloon Tips on Start Menu items
    NoAutoTrayNotify : Turn off Task Bar area cleanup notification
    LockTaskbar : Lock the Taskbar and prevents the User from moving or resizing it
    NoSearchCommInStartMenu : If enabled Start Menu search will not search for Communications.
    NoSearchProgramsInStartMenu : If enabled Start Menu search will not search for Programs.
    NoSearchInternetInStartMenu : If enabled Start Menu search will not search for Internet History
    NoSearchFilesInStartMenu : If enabled Start Menu search will not search for Files
    This list is not exhaustive. You can simply study the registry key's DWORD's, illustrated above and see that there would be many more such tweaks or hacks available. The ValueNames are roughly indicative of what they would do.
    Take the example of NoRun. Its value is set at 0. If you open Taskbar & Start Menu Properties > Star Menu Tab > Start Menu > Customize. You will see a checkbox to Add Run command to the Start Menu. But if you now go back to regedit, and change the DWORD of NoRun to 1, and now go back to the Start Menu properties box, you will see that the item to Add Run itself will be missing ! So, enabling or disabling such options through Vista Registry, will allow or prohibits users, from executing such actions through the Properties box.
                          

    Twitter Delicious Facebook Digg Stumbleupon Favorites More

     
    Design by Kang Iwan K-sev | Thank's for your visit To My Site - Ridwan Mulyana | Cibeureum